OUTDOOR PROJECTS TACKLED DURING QUARANTINE
They say April showers bring may flowers, or so I hope. Since we worked on the inside of the house (in the backroom) for almost a year, it was time for a change of scenery to the outdoors! Today I will be sharing an easy DIY flower box, and garden fence.
We were chipping away at doing some maintenance like touch ups to the deck, arbor and base, so it was time to put some focus on some other things! I spent lots of time on pinterest, and showed Peter a few things I liked, so one day we made a decision for both the flower boxes and the garden and we made a trip to Lowe's for ALL of the materials!
 AFTER
AFTER
 BEFORE
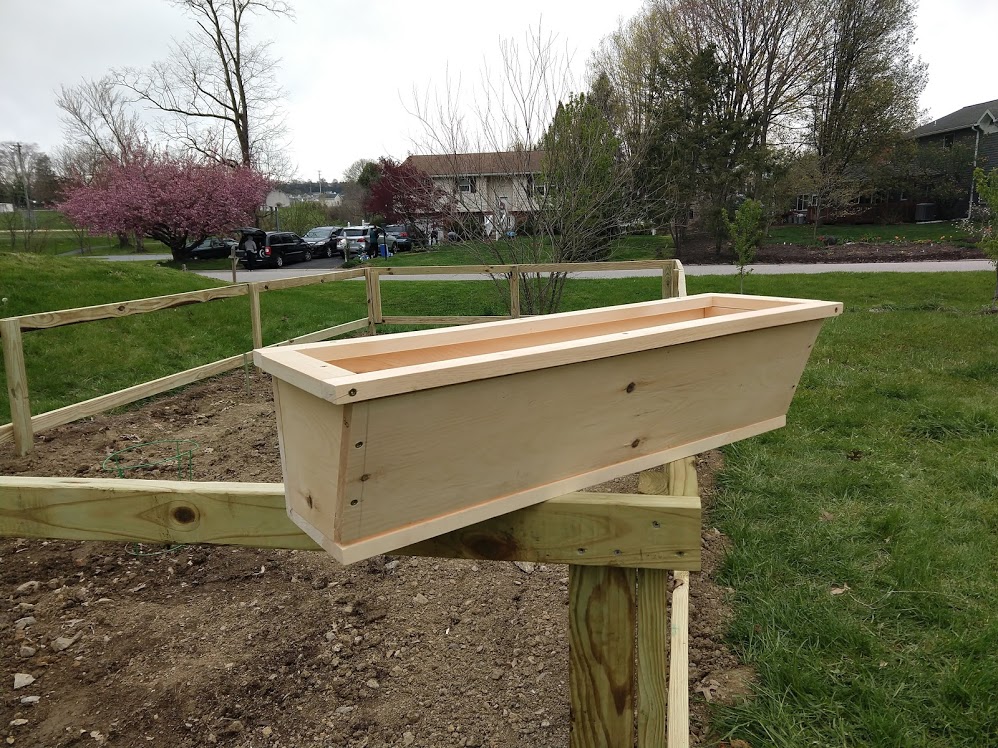
I am SO happy with how they turned out, they were super easy to make so I am going to share with you these easy flower boxes DIY.
Supplies needed:
- 1 box - Exterior Screws (Click here for link)
- 3 count - 1-in x 10-in x 8-ft Pine Board (click here for link)
- 2 count - 1-in x 2-in x 8-ft Pine Board (click here for link)
- Desired paint
Our steps:
- We measured the windows and made sure what size we wanted, so our planters are about 32 inches long and 10 inches deep.
- Cutout all the boards to size from out 8ft boards. This included the back, the front, and the bottom, all of which as still 10" deep, and that new size of 32" long.
- The size pieces are then cut to be a 10x10 square, but then the one size is cut down to 8.5" on the bottom side so that the front part will end up with and angle.
- The top piece is then made of two longer 32" pieces of trim and two 8.5" pieces for the sides.
- Then from there, it's as simple as using screws to attach the boards! We first pre-drilled the holes to be sure not not crack it, but then we just used 3 screws on the longs sides, and 2 on the short sides to attach each board.
- After that used some wood putty to fill in the screw spots, and finished it off with a coat of paint.
And beyond the flower boxes, we had also revamped our garden fence as the old one had been temporary and began to get more wobbly!
The materials:
- 2 box - Exterior Screw (click here for link)
- 32 count - Pressure Treated Lumber 2-in x 4-in x 8-ft
Sorry, I couldn't find a link to the specific ones we got from Home Depot - 2 count - Exterior Hinges
We got these from Lowes. Can't find the specific one, but you can get your preferred styles. - 1 count - Exterior Lock
We got this from Lowes. Can't find the specific one, but you can get your favorite item. - 1 can - Pre-stain (click here for link)
1 can - Stain (click here for link)
Our steps:
- Cut all the boards down to size for our garden.
- There are 11 posts, each at 4 ft tall. There are then 8 horizontal boards ( on the short sides ) that are 6 ft long. On the long sides there are 10 boards at 8 ft long, then two 5 ft boards next to the door.
- The long pieces are then attached to the posts, at the top, and 2 ft down from the top using 2-5 screws at each joint. We made the fence in 4 parts (4 sides) on the ground before putting posts into the ground.
- Once together, we dug all the holes, with a post hole digger to 1.5 ft deep. This was a real challenge as we have lots and lost of stone fill in our property.
- Once the holes were dug, we moved the sides upright, and slid them into the holes, attaching the corners together with more screws.
- In the steps, we did skip the explanation door part, as that was more of a "make it up as you go" scenario. For that, we made it the extra 3 feet wide needed to fill the space missing on that side, 2 ft tall to match the height of the other verticals, then used a crossed wood just measured to be cut to size between, in order to give it a little decoration. that's all held together with screws, then attached with two hinges along the joints.
Thank you so much for reading! We now feel like our outdoors area is feeling complete! We can come outdoors and enjoy all the hard work we have put into our outdoor space. let me know what you think!
Posted: 06/30/2020