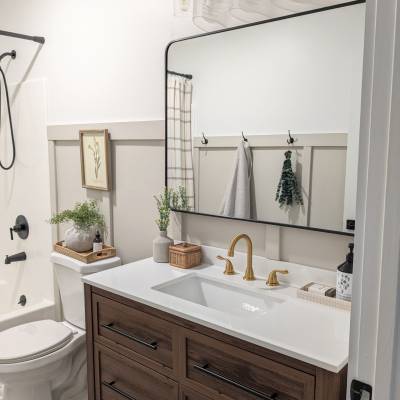
A Master Bathroom remodel- our Master area is now complete!!
Our Master bedroom and bathroom are now complete! I seriously cannot believe it... But it feels so good to finally be able to enjoy this room and especially reflect on all the hard work that it took to get us here!
Man this was a long time in the waiting! We knew this wouldn't be an easy project so we definitely split them in two. See our Master Bedroom Reno blog here!
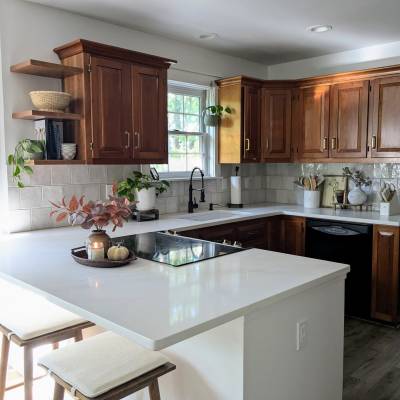
We slowly picked at the Master Bathroom, so we wouldn't be overwhelmed (because we also had some overlap where we were getting our kitchen worked on at the same time!) See that blog here. It's one you don't want to miss!
The "toilet room" was the first thing we checked off the list since it was the easiest.
Here is the BEFORE:

A tall empty white walled space with a toilet (and note not much lighting coming through from the window)
And the AFTER:

We painted the walls, including an accent wall (squirrel's tail by BM) behind the toilet, and added some beautiful wooden shelves. The significant change we made in here, which made the biggest impact, was switching the door to the other side, allowing a lot more light to come through!
Onto the shower!
The BEFORE:

The AFTER:

The shower frame was getting super rusted, and growing film on it due to the material ware and tare from over time. The frame was the first thing to go, so we could work on the shower tub. The tub itself is in great shape so we decided to apply a tub and tile refinishing kit to it and painted it white. In the meantime we ordered this black framed clear shower door/frame kit and although it was a tricky install, the outcome looks amazing! The shower is much cleaner looking and feels like a bigger space as well.
Vanity and counter-top
THE BEFORE:
%20copy.jpg?_t=1748782068)
The vanity and counter-top were still in good shape, so we decided to save some $$ and repaint it and replace the hardware.
The AFTER:

We repainted the vanity in squirrel's tail by BM, and applied a special counter-top refinishing kit in matte black by rust oleum. After we replaced all the hardware, mirror, and lighting it looked like a whole new vanity!!!!
Before the tub was placed, we replaced the ugly green linoleum and added an absolutely beautiful neutral floor tile.
The BEFORE:

Seriously this flooring was so ugly and made the room feel dark, so we knew we needed to get something modern and bright to bring this room together. Though this was the hardest thing to decide on because of the endless options, boy did we score!!
The AFTER:

It took about 3 days from start to finish to complete the flooring. To say we love the flooring is an understatement! We were looking at LVP, but just couldn't find something we loved or meet what we were envisioning for the room. Decided to switch to tile, there are no regrets. It's even more beautiful in person! It immediately made the space feel bigger and brighter instantly!
NOW for the GRAND FINALE!!!!!!!!!!!!!!!
Pete and I for the longest time decided, nah we will just keep the jacuzzi and repaint the whole thing and replace the hardware that was in it. Time went on and the more we thought about it, we said we need to do it right and just rip it out!
Why you ask? The cons outweighed the pros: It was difficult to get in and out of( because of how big it was), it was very hard to keep clean, the only way to get to the window was to get inside of the tub, and it made the space feel enclosed.
The BEFORE:

When I tell you this thing was a monster, seriously no joke! Peter had to use multiple saws to cut the wooden frame it was sitting in, and the tub it's self to cut it into multiple pieces to even get it out to fit through the doorways. We don't have small doorways, their pretty standard size, so that tells ya just how big it was!
Tearing down the surrounding tile, left behind just studs so we put up some drywall/patched/sanded and painted.
The AFTER:

I can now say our Master Bathroom truly feels like an oasis! Slowly over time we will keep adding some special touches, but it truly is a space we want to be in, especially that soaking tub! It's sleek, fits the space well, and truly made the space feel bigger while being free standing. We 100% are SO glad we decided to suck it up and do all the hard work to have this new tub, it was worth it and definitely "completed this room."
Links:
- Faucets
- Mirror
- Lighting
- Flooring
- Handles
- Shower Faucet set
- Shower frame
- Freestanding soaking tub
- Tub filler
- Side table
- Hand Towel/hook set
Thank you so much for your patience, as this definitely was not an easy or a quick reno. Though we took it in phases, we are thrilled with the results and find ourselves with big smiles when we walk into this space! A lot of blood, sweat and tired muscles went into this project, but we can now take a step back and embrace what it led to. It turned out better than we had even envisioned!
Posted: 09/11/2024